Demonstration notebook for the mailcom package
Scientific Software Center, University of Heidelberg, May 2025
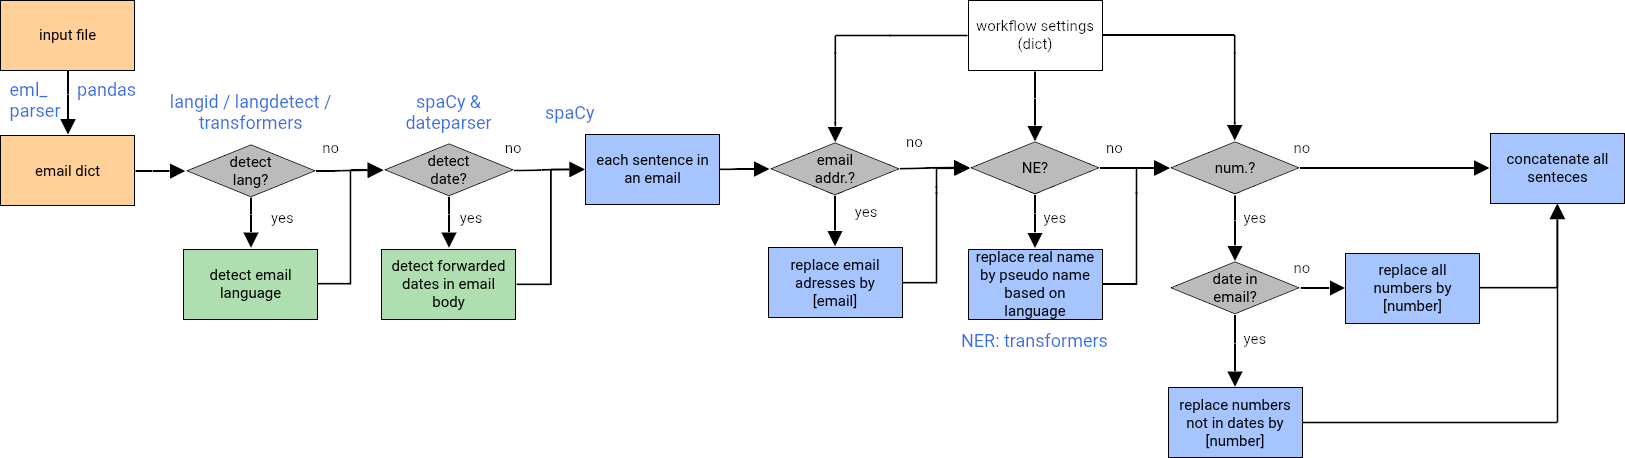
The mailcom package is used to anonymize/pseudonymize textual data, i.e. email content or more general text provided as a tabular input. It takes an eml, html or csv file as input and extracts information about attachments, number of attachments and type, and the content of the email body and subject line. The email body and subject line are then parsed through `spaCy <https://spacy.io/>`__ and divided into sentences. The sentences are fed to a
`transformers <https://huggingface.co/docs/transformers/en/index>`__ named entity recognition (NER) pipeline, and person names, places, organizations, miscellaneous, are detected in the inference task. Names are replaced by pseudonyms, while locations, organizations and miscellaneous are replaced by [location], [organization] and [misc]. The text is further parsed using string methods, to replace any
numbers with [number] and email addresses with [email]. The processed text and metadata can then be written to an xml file or into a pandas dataframe.
mailcom can automatically detect the (dominant) text language and also has the capability of preserving dates in the text (so that only numbers are replaced, but not patterns that match dates).
Please note that 100% accuracy is not possible with this task. Any output needs to be further checked by a human to ensure the text has been anonymized completely.
The current set-up is for Romance languages, however other language models can also be loaded into the spaCy pipeline. The transformers pipeline uses the xlm-roberta-large-finetuned-conll03-english model revision number 18f95e9 by default, but other models can also be passed via the config file (see below).
Before using the mailcom package, please install it into your conda environment using
pip install mailcom
After that, select the appropriate kernel for your Jupyter notebook and execute the cells below to import the package. The package is currently under active development and any function calls are subject to changes.
You may also run this on google colab via the link provided in the repository.
[ ]:
# if running on google colab
# flake8-noqa-cell

if "google.colab" in str(get_ipython()):
    # install this from pypi
    %pip install git+https://github.com/ssciwr/mailcom.git -qqq
    # download the sample data
    !wget -O sample_data.csv https://raw.githubusercontent.com/ssciwr/mailcom/main/data/in/sample_data.csv
    # download default settings file
    !wget -O default_settings.json https://raw.githubusercontent.com/ssciwr/mailcom/main/mailcom/default_settings.json
    # download the sample eml/html files
    # optional: download the sample data
    !wget -O "Bonjour_Agathe.eml" "https://raw.githubusercontent.com/ssciwr/mailcom/main/mailcom/test/data/Bonjour%20Agathe.eml"
    !wget -O only_html.eml https://raw.githubusercontent.com/ssciwr/mailcom/main/mailcom/test/data/only_html.eml
[ ]:
import mailcom
import pandas as pd
from IPython.display import display, HTML
import pprint

pp = pprint.PrettyPrinter(indent=4)
Processed text visualization
The cells below define functionality used to display the result in the end, and highlight all named entities found in the text. You may redefine the color assignment if you wish with any html-compatible colors.
[ ]:
# a dictionary matching colors to the different entity types
colors = {
    "LOC": "green",
    "ORG": "blue",
    "MISC": "yellow",
    "PER": "red"
}
The highlight function below is used to visualize what will be replaced in the text, but only after email addresses in the input text have been pseudonymized (i.e. replaced with [email]).
mailcom workflow
mailcom goes through the processing steps as depicted in this flowchart:
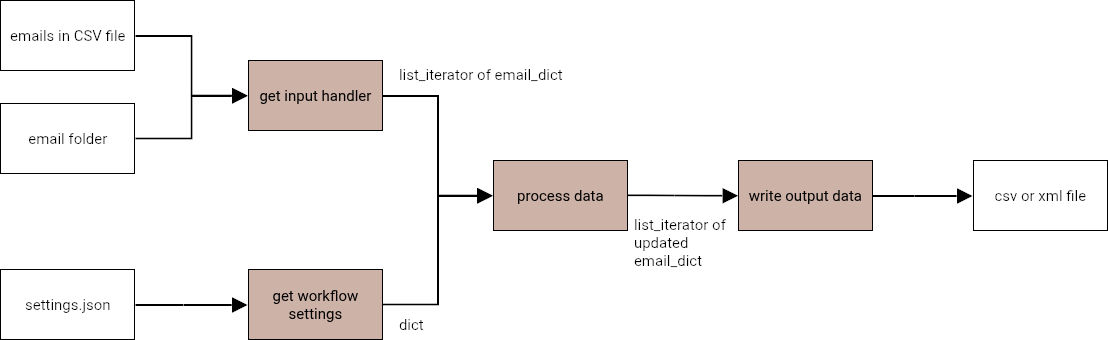
In the processing step, several options are available and explained below:
Configuring your text processing pipeline
All settings for the whole text processing are stored in the file `mailcom/default_settings.json <https://github.com/ssciwr/mailcom/blob/main/mailcom/default_settings.json>`__. You can customize them by:
Creating a new configuration file by copying and modifying the default settings file, or
Updating specific fields when loading the configuration.
The function mailcom.get_workflow_settings() is used to load and update the workflow settings.
[ ]:
# get workflow settings from a configuration file
# you can either leave this at the default settings or modify the file directly
setting_path = "default_settings.json"
workflow_settings = mailcom.get_workflow_settings(setting_path=setting_path)
# print the workflow settings for visual inspection
pp.pprint(workflow_settings)
The configuration options in the settings are (see more explanations below):
keyword |
options [default in parenthesis] |
explanation |
|---|---|---|
|
[“fr”], “es”, “pt” |
default language of the textual data |
|
[[“subject”, “content”]], a list of field names |
fields for pseudonymization |
|
[true], false |
replace email addresses by [email] |
|
[true], false |
replace named entities by pseudonyms |
|
[true], false |
replace numbers by [number] |
|
[true], false |
detect datetime objects and protect from replacement as [number] |
|
[“strict”], “non-strict” |
the pattern matching used to detect date/time patterns in the text |
|
automatically detect language of each input file/ |
|
|
[null], {valid transformers model name, revision number, and pipeline, aggregation strategy} |
the transformers pipeline to use for the NER |
|
[“default”], valid spaCy model |
which spaCy model to use for the sentence splitting |
|
[null], {“task”: “text-classification”}, for others see here |
the pipeline to use for the language detection, only valid for transformers language detection |
|
see below |
the used names for pseudonymization of person names, per language |
|
[“unmatched”], a valid string |
when reading a |
These keywords set the options for the main processes of the mailcom package.
Default language
The default language can be used for text that is always in the same language, that is, each eml/html file or row of the csv contains data in the same language. If this is the case, processing is much faster. If not, the language of the text can be detected on-the-fly: In this case, leave the default language empty, i.e. "" an empty string.
Pseudonymization settings
To define which fields should be pseudonymized, the keyword pseudo_fields is assigned a list of field names.
The keywords pseudo_emailaddresses and pseudo_numbers are by default set to true, which triggers the replacement of email addresses such as email@gmail.com by [email], and numbers such as 69120 by [number].
By using pseudo_ne, the replacement of recognized entities by a pseudonym or spaceholder is triggered. A person’s name, i.e. “Michael” is replaced by a pseudonym, for example, “James”, a location like “Paris” is replaced by [location], an organization such as “GitHub” is replaced by [organization], and other entities like “iPhone 15” are replaced by [misc].
All these three options related to replacement of identifying information can be triggered separately, but are set to true by default.
Note that same person names are replaced by same pseudonyms without considering gender. The pseudonyms that are used can be changed as detailed below.
Dynamic language detection
The keyword lang_detection_lib determines the settings for the dynamic detection of the language. While this increases the processing time, it is crucial for correct sentence splitting when multiple languages are present in the data (i.e. one file is Spanish and one French, or some rows of the csv files contain text in a different language). In principle, the language can be determined for each sentence; but the general use of this capability is language detection per eml/html
file/row in the csv file.
Please note that the default language must not be set for this option to be triggered (``default_lang=””``)!
Three different libraries are available for language detection, `langid <https://github.com/saffsd/langid.py>`__, `langdetect <https://github.com/Mimino666/langdetect>`__, `transformers <https://huggingface.co/papluca/xlm-roberta-base-language-detection>`__, that all lead to a similar performance on our test set. With the language detected dynamically, the spaCy model for sentence splitting is also set dynamically based on the detected language for each file/row; this should be
combined with the default option for the spaCy model in order to work correctly.
Datetime detection
Using the keyword datetime_detection, mailcom can detect patterns that match dates, such as “09 février 2009” or “April 17th 2024” for "non-strict" parsing. These patterns can then be protected from the replacement of numbers, which would result in (for these examples) “[number] février [number]” or “April [number]th [number]”. This feature could be important in texts in which chronology is not easy to follow, or where it is important to retain any information about time in the data.
Setting the time_parsing to "strict", only precise date-time formats such as “17. April 2024 um 16:58:57” or “17.04.2024 17:33:23” are detected, not using the more flexible pattern matching rules as in “April 17th 2024”. This option could be useful for identifying forwarded dates within email bodies.
Selected models and model pipelines
The transformers pipeline specifies which tasks the LLMs should carry out, and which models and revision numbers should be used. Here is an example for the transformers pipeline, with the default options:
"ner": {
    "task": "token-classification",
    "model": "xlm-roberta-large-finetuned-conll03-english",
    "revision": "18f95e9",
    "aggregation_strategy": "simple",
}
The task is token-classification, which is NER (for a description of the available tasks, see here). The default model is Hugging Face’s default model for this task and default revision number as of January 2025. The aggregation strategy determines how the tokens are aggregated after the pipeline; with simple the text is basically reconstructed as it was and the beginning and end of each recognized NER is given in
accordance. The options task and aggregation_strategy are not likely to be changed by the user, however you may want to use a different model and revision number, which is possible using the ner_pipeline keyword.
The keyword spacy_model sets the model to use for the sentencizing and pattern recognition. It is important that the initial text is split into sentences with a high accuracy, since this directly affects the subsequent NER accuracy. If the keyword is set to default, the models that spaCy uses as default for the given language is used. Some of the default models are:
"es": "es_core_news_md"
"fr": "fr_core_news_md"
"de": "de_core_news_md"
"pt": "pt_core_news_md"
"en": "en_core_web_md"
Other models can directly be passed using this keyword, see the spaCy reference. Please also note that not all spaCy models have pipelines with the necessary components.
Pre-set pseudonyms
First and last names are replaced by pseudonyms. To make the pseudonimized text read more smoothly, names that are common for a specific language can be chosen; but basically any names can be set for any language using the pseudo_first_names keyword. The default option is:
pseudo_first_names = {
        "es": [
            "Marta",
            "Alejandro",
            "Isabel",
            "Sergio",
            "Raquel",
            "Carlos",
            "Dayana",
            "Ferran",
            "Elena",
            "José"
        ],
        "fr": [
            "Julien",
            "Manon",
            "Stéphane",
            "Nathalie",
            "Georges",
            "Denise",
            "Idriss",
            "Aïcha",
            "Hugo",
            "Léa"
        ],
        "de": ["Mika"]
    }
Set a new default by updating the dictionary as this:
pseudo_first_names = {
        "en": [
            "James",
            "Elizabeth",
        ],
}
Updating settings on-the-fly
You may modify the settings on-the-fly as shown in the cell below. The settings for each run are saved in the provided folder to ensure reproducibility.
[ ]:
# update some fields while loading the settings
# example here: language that is not included by default
new_settings = {"default_lang": "el", "spacy_model": "el_core_news_sm"}
# or: use dynamic language detection
new_settings = {"default_lang": "", "spacy_model": "en_core_web_md"}

# save the updated configuration to a file for reproducibility purposes
new_settings_dir = "."
workflow_settings = mailcom.get_workflow_settings(new_settings=new_settings,
                                                  updated_setting_dir= new_settings_dir,
                                                  save_updated_settings=True)
If updated_setting_dir is not provided, the file is saved in the current directory. To skip saving, set save_updated_settings to False.
Reading input data
We currently support two types of input data: (1) a csvfile and (2) a directory of eml and/or html files.
Each row of the csv file, eml file, or html file will be stored in a dictionary, with pre-defined keys: content, date, attachment, attachment type and subject. Dictionaries of eml and html files have an additional key named file_name.
Of these pre-defined keys, only ``content`` and ``subject`` will be processed through the pipeline, all other information is retained as is.
The dictionary collects all the information and can be converted into a dataframe in the end, to export to csv, or for each processed file/csv row an xml file can be written. Thus, the keys that are used in the processing dictionary should match the final column names of the dataframe / the xml keys. These keys can be freely defined, with the exception of content and subject, which specify data that should be pseudonymized. Additional keys are added to the dictionary in
the processing.
Reading from a csv file
When loading a csvfile as an input, a list of columns in the file to map with the above pre-defined keys should be provided, in the correct order.
Example of column matching:
The csvcontains the column names:
file |
message |
date |
number of attachments |
attachment type |
subject |
|---|---|---|---|---|---|
4.eml |
Emily moved to New York City on April 10, 2021. |
2021-07-16 |
2 |
[jpg, png] |
news from me |
… |
… |
… |
… |
… |
… |
We then need to pass the column names that should be retained to the processing function; columns that should be dropped should be excluded from this list:
matching_columns = ["message", "date", "number of attachments", "attachment type", "subject"]
In this example, the “file” column will be dropped and not be included.
We then need to tell mailcom, what the columns should be matched in the processing dictionary, in the correct order:
pre_defined_keys = ["content", "date", "attachment", "attachment_type", "subject"]
In this case, the content of the column “message” will be mapped to “content”, “date” to “date”, “number of attachments” to “attachment”, “attachment type” to “attachment_type”, and “subject” to “subject”. Only “content” and “subject” will be pseudonimized. The final data structure will look like this:
content |
date |
attachment |
attachment_type |
subject |
cleaned_content |
lang |
detected_datetime |
pseudo_content |
ne_list |
ne_sent |
sentences |
sentences_after_email |
|---|---|---|---|---|---|---|---|---|---|---|---|---|
Emily moved to New York City on April 10, 2021. |
2021-07-16 |
2 |
[jpg, png] |
news from me |
Emily moved to New York City on April 10, 2021. |
en |
[] |
James moved to [location] on April [number], [number]. |
[{‘entity_group’: ‘PER’, ‘word’: ‘Emily’, ‘start’: 0, ‘end’: 5, ‘pseudonym’: ‘James’}, {‘entity_group’: ‘LOC’, ‘word’: ‘New York City’, ‘start’: 15, ‘end’: 28, ‘pseudonym’: ‘[location]’}] |
[0, 0] |
[‘Emily moved to New York City on April 10, 2021.’] |
[‘Emily moved to New York City on April 10, 2021.’] |
In the processing, additional keys (column names) are added to the data, namely “cleaned_content”, “lang”, “detected_datetime”, “pseudo_content”, “ne_list”, “ne_sent”, “sentences”,”sentences_after_email”, that will be explained below. The column “file” has been dropped.
Column mismatch
If the columns in the csv don’t align with the pre-defined keys, any unmatched keys will be assigned the value specified in unmatched_keyword during processing, for instance:
matching_columns = ["message", "date"]
where the csv contains the columns “message” and “time”. There is a mismatch between the provided column names in matching_columns, and the actual columns in the csv (“date” versus “time”). Now giving the pre-defined keys
pre_defined_keys = ["content", "date"]
results in mailcom not being able to assign “date”, since it is not found in the csv. Instead, “date” is then marked with “unmatched” for each entry by default, or any other string that has been defined through the unmatched_keyword keyword: | content | date | |———|——| |… | unmatched | |… | unmatched |
The examples below shall serve to demonstrate the input options and resulting behaviour of mailcom when processing csv files.
[ ]:
# path to your csv file - change this to your own file
input_csv = "sample_data.csv"
# the columns of the csv that should be passed through the processing pipeline/retained in the pipeline
matching_columns = ["message", "date", "attachment", "attachment_type", "subject"]
# the predefined keys that should be used to match these columns, in the correct order
pre_defined_keys = ["content", "date", "attachment", "attachment_type", "subject"]
# what to call any columns that are not matched to pre-defined keys
# get this from the workflow settings
unmatched_keyword = workflow_settings.get("csv_col_unmatched_keyword")

input_handler = mailcom.get_input_handler(in_path=input_csv, in_type="csv",
                                          col_names=matching_columns,
                                          init_data_fields=pre_defined_keys,
                                          unmatched_keyword=unmatched_keyword)
In the cell above, the message column from the csv file is mapped to the content key in the email dictionary.
[ ]:
pp.pprint(input_handler.email_list[3])
Here, we have asked the input handler only to match five of the columns, the “file” column of the original data is discarded.
Reading eml/html files from a directory
mailcom can also read multiple files at once from a given directory. You can provide relative or absolute paths to the directory that contains your eml or html files. All files of the eml or html file type in that directory will be considered input files.
[ ]:
# import files from input_dir - change this to your own directory
input_dir = "."
input_handler = mailcom.get_input_handler(in_path=input_dir, in_type="dir")
The data is then loaded into the same dictionary structure used for the csv input file, with the addition of a file_name key.
Processing of the data
In the cell below, the emails are looped over and the email content is processed. Depending on the settings, each “content” goes through the following steps:
language detection (optional)
date time detection (optional)
email address pseudonymization (optional)
named entity pseudonymization
number pseudonymization (optional)
For steps 3-5, the email content is divided into sentences, which are then pseudonymized. The modified sentences are recombined into a text and stored in the processing dictionary under the key "pseudo_content".
[ ]:
# process the input data
mailcom.process_data(input_handler.get_email_list(), workflow_settings)
After pseudonymization of all records, the named entities in the input text are highlighted as follows: This can serve as a visual aid to control the workflow settings and accuracy of the used models.
[ ]:
# loop over mails and display the highlights
for email in input_handler.get_email_list():
    # get NE for each sentence in the email
    ne_sent_dict = {}
    for field in workflow_settings.get("pseudo_fields"):
        ne_sent_dict[field] = {}
        for sent_idx, ne in zip(email["ne_sent"][field], email["ne_list"][field]):
            if str(sent_idx) not in ne_sent_dict[field]:
                ne_sent_dict[field][str(sent_idx)] = []
            ne_sent_dict[field][str(sent_idx)].append(ne)

    # display original text and highlight found and replaced NEs
    html_content = []
    for field in workflow_settings.get("pseudo_fields"):
        for sent_idx, sentence in enumerate(email["sentences_after_email"][field]):
            ne_list = ne_sent_dict[field].get(str(sent_idx), [])
            highlighted_html = mailcom.highlight_ne_sent(sentence, ne_list, colors)
            html_content.append(highlighted_html)
    display(HTML("<br>".join(html_content)))
Processing keys and output explanations
The processing of the data through mailcom results in the original data being retained in the processing dictionary, with content and subject as keys for the data that is pseudonymized; and additional keys (column names) are added to the data, with the following entries:
output key |
explanation |
|---|---|
cleaned_content |
the content after cleaning of linebreaks and spaces |
cleaned_subject |
the subject after cleaning of linebreaks and spaces (if any) |
lang[field] |
pre-set or detected language for each field of the entry |
detected_datetime[field] |
detected datetime objects for each field, if any |
pseudo_content |
the pseudonymized text of |
pseudo_subject |
the pseudonymized text of |
Additional data is saved in the processing dictionary, that is primarily used for the highlighting of the replaced named entities, and can be discarded if it is not needed. The values of the following keys are themselves dictionaries, where the keys represent field names. Thus, output_key[field] represents the value associated with that specific field.
output key |
explanation |
|---|---|
ne_list[field] |
the list of recognized named entities and their properties |
ne_sent[field] |
indices of sentences containing named entities |
sentences[field] |
a list of sentences as detected by spaCy, of the field’s text |
sentences_after_email[field] |
the list of sentences after replacing email addresses by [email] |
Postprocessing
After this, the output can be written to a file or processed further. The output is a list of dictionaries, each containing the metadata of the email and the pseudonymized content. In the below cell, the output is converted into a pandas dataframe.
[ ]:
# write output to pandas df
df = pd.DataFrame(input_handler.get_email_list())
df.head(5)
mailcom can write the processed data to a csv file:
[ ]:
# set overwrite to True to overwrite the existing file
mailcom.write_output_data(input_handler, "out_demo.csv", overwrite=True)
The processed data can also be written to multiple xml files. This feature has not been fully implemented yet as the targeted xml structure is yet unknown. Please provide information using this issue.
[ ]:
mailcom.write_output_data(input_handler, "out_demo.xml", overwrite=True)
[ ]: